Sneak Peak - Flowering Desert


How fun is this cactus? As soon as I saw this set I knew I had to buy it, there are so many ideas for all sorts of cacti plant cards :)

This card came together quite quickly because I used the  new rectangle stitched dies to cut out the layering mats and also a piece for the sentiment. The pear pizzazz and lovely lipstick colours go together beautifully and the glitter dots add a little but of bling. I added a layer of the subtle embossing folder for a more rustic look to the background. 


Product List
your photo name

Merry Christmas!


To all my family and friends I wish you a very Merry Christmas. Stay safe on the roads if you are planning on travelling.

Thank you for your continued support for my Stampin' Up! business. I really appreciate every single one of you. 

I am taking a few days break to spend time with family and friends and recharge for 2019. Then I will be back with some sneak peeks from the new Occasions catalogue and sale-a-bration starting January 3rd.  


your photo name

More Christmas Treats - Ho, Ho, Ho!


I have seen these boxes floating around Pinterest for a few years now and they have been on my to-do list.

I made some time last week to finally make some and I'm rather chuffed with the result. They are quite easy to make, you just need to make sure the cuts are quite accurate to ensure a snug fit of the lid.

I followed the instructions I found HERE. Some of the items used in the video have retired (like the 1 3/8"circle punch) but these can easily be substituted with the layering circle framelits


I kept the colour scheme the same but changed up the decoration on the lid. I used a brand new framelit coming soon - stitched rectangles! Yay - I have been wanting something like these for ages and I am so pleased they are here. You can get yours from January 5th.


Product List
your photo name

Cheeky, cute Elves!

I love these little elves - they are just too cute!


I also love using designer series paper (DSP) as wrapping paper. In this case, I had some little gifts for table favours. I chose the newspaper print design from the Dashing Along DSP.

And did you notice that there isn't any stamping on these cuties?  I die cut the elves from the Santa's Workshop DSP (sadly out of stock now) and also die cut the circle shapes behind them.

Add some ribbon and they are good to go!!


Product List
your photo name

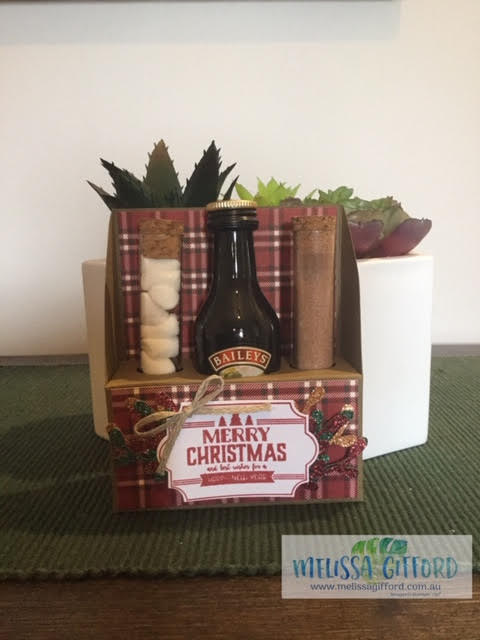
Mini Baileys hot chocolate boxes


As soon as I saw these gorgeous packages on Erica Cerwin's blog I knew they would make fantastic favours for Christmas. Baileys, marshmallows and hot chocolate - yum!

Last weekend we had a Christmas dinner with Hubby's work so I made up a bunch of these - they were a real hit! I'm going to make some more for a few more friends we will be seeing over the Christmas holidays.  

Erica has a fabulous tutorial on her blog so I encourage you all to head over there and make one for yourself. They are quick and easy to make - and fun!


your photo name

New items added to the clearance rack


The Clearance Rack has been updated! There are some amazing deals at up to 60% off.

Stock is limited. 

SHOP HERE
your photo name

Year End Closeout Continues

Reminder - the Year End Closeout continues only while stocks last........


All good things must come to and end -  the Holiday Catalogue time is here.

Now is your chance to grab retiring products - some up to 50% off!! only while supplies last

SHOP HERE


your photo name

Stampers Anonymous Blog Hop 2!

Hello and welcome to our second Stampers Anonymous Blog Hop!!


This month we are showcasing two of the brand new stamp sets that we received at Onstage in November. Both these sets (and so much more) will be available to customers January 5th 2019. 

The set I chose to showcase is called Amazing Life. A really fun set with fun words and fabulous fonts.

I have made this style of all-in-one card/envelope style before but I saw one made by Tania Tobin it reminded me to make some more. She kindly shared the measurements and considering how late I am making this card and blogging it in time for the blog hop I was happy to follow her.    


First I used my 6x6 paper stacks - this time Pacific Point. Using my envelope punch board I quickly made the envelope then added the inside layers and the belly band. The hardest bit really was choosing a colour.


I kept the card quite plain just using the pacific point ink and the various images from the stamp set for both the front and the inside of the card. 


I added the cake image to a layer of silver foil cardstock and added it to the belly band. 

I love how it turned out and I hope you do too!

Click through the other blogs to see what the other talented girls have created. 

  1. Nikki Stalker - nicolestalker.com.au/blog
  2. Elizabeth Yager - https://craft.yager.net.au
  3. Marelle Taylor - www.marelletaylor.com
  4. Melissa Gifford - http://www.melissagifford.com.au/2018/12/stampers-anonymous-blog-hop-2.html - YOU ARE HERE!
  5. Meighan Wheller - https://meighanwheller.blogspot.com/
  6. Sharon Wilson - http://stampinwithsharon.com.au/
  7. Kylie Page - http://www.stampersworkshop.com/stampers_anonymous_bloghop2/
  8. Kristy Davy - https://kristyscards.wordpress.com


your photo name

Show Your Heart Blog Hop


Today I  have a very special blog hop to share with you. My sweet, talented friend Tania Tobin has set up a special group called Stamping for Heart Kids to raise awareness for kids born with heart disease.


Not surprisingly the theme for this blog hop is LOVE.

And I do have a lot of love for new products which I thought were perfect for this blog hop. As a Stampin' Up! demonstrator I am fortunate to be able to pre-order from the new Occasions Catalogue available January 3rd 2019.


This new suite is called All My Love. Here I have used the All My Love Designer series paper and the Be Mine Stitched framelits. The sentiment comes from another new stamp set called Incredible Like You. 

I was inspired by this card by Lisa Hardie. I didn't change the layout too much as the paper is the highlight of this card! 

I also decorated a mini gable box - these are my go-to boxes for a quick and fun way to package small treats. 

Heart Kids are always looking for donations to support their fund and would appreciate any help you can give them. My husband and I have been very fortunate to have two healthy teenage girls and I cannot begin to imagine what some of these families go through. 

If you would like to donate please click HERE


Click through the rest of the links below to see the rest of the fabulous creations.


your photo name

Celebrate the Season

Now that the December birthdays are over I am in full Christmas mode! This week I will share what I have been up to behind the scenes!! 

This is one of the Christmas cards I made to send to family and friends. Because I send so many cards I am always looking for cards that are quick and easy to mass produce. This style of card is one of my go-to designs because I can make it in batches. 

How do you make your cards? I tend to cut and prep all the pieces then put them all together at the end. Kinda like a mass production line.

By cutting the cardstock at 3 x 4 inches I maximise the use of the sheets of designer series paper. The circle and small oval die cuts are quick to pump out and then it is just a case of layering it all onto the card. 


I love that the card still looks Christmassy in these colours. I stamped the mistletoe stamp on the base of the card in versamark ink to create a subtle look. I embossed the night of navy cardstock piece with the Subtle embossing folder.

I thought I saw this card on a blog but I cannot seem to find it again to know who to credit. If it was you, please let me know!

The red berries were stamped in real red ink - for some cards I used the red rhinestone jewels. 


Product List
your photo name