Mum's Mothers Day gift

As promised here is the gift I made for my Mum for Mother's Day.


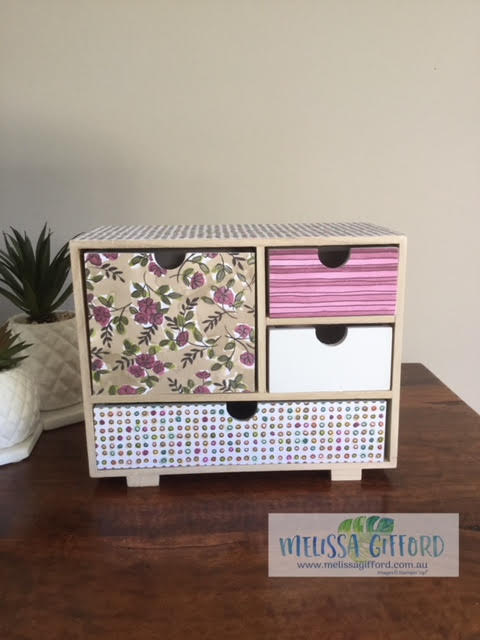
I purchased this set of drawers from Kmart with the intention to decorate them as I thought they looked a bit naked! 

There is nothing fancy about what I did - I just showcased the Share What You Love designer series paper and adhered them to the drawers with my favourite multi liquid glue. I found the 1" circle punch handy for the cut outs for the drawers. 

Again I contemplated adding more like Mum's initial but not knowing where she might put it in her house I decided against it. I can always add it later if she needs it!  

I left one of the drawers white to balance out the patterns. 

What do you think? I love it so much I plan to make more - they will look fab on my craft desk and are so handy to store all my little bits and pieces. There were a few different options in the shop so I might *need* them all!!


Product List
your photo name

Happy Mother's Day Mum!

I wanted to send out an early wish for a very happy Mother's Day to all the Mums out there, hope you get to have a wonderful day surrounded by those you love. 

I made this card for my Mum - it is called an Eclipse card. There are heaps of tutorials on youtube but it really is quite simple to make. 

Line up your large letter dies on a piece of designer series paper and run it through your bigshot - as i needed 2 'M's I did it twice. Layer the DSP onto a piece of black cardstock. Add dimensionals to the letters and stick them back in ever so slightly off centre to allow for a sliver of the black to show creating a shadow effect.  

I wanted to showcase the stunning  Share What You Love designer series paper so I left the card as it is. I tried adding some embellishments but thought it made it look too busy. Sometimes less is more right? It is a little hard to see but this paper has a gorgeous pearl sheen to it - a nod to Stampin' Up's 30th Anniversary this year. 


Stay tuned over the next few days to see the matching gift I made!  


Product List
your photo name

Tutti Fruitti Pens

These pens were a very last minute addition to my onstage swaps in April. I saw them on Sam Donald's blog (pootles.co.uk) and fell in love with them. I ordered the pens from overseas (through ebay) and they took a while to arrive but I managed to make up a handful to share just in time. 

These pens match perfectly with the Tutti Frutti Suite in the occasions catalogue. This whole suite of cuteness is on the retirement list . 

The washi tape and the mini punches (on sale too!) added some flair to the pens. I matched the fruit in the pens to the designer series paper and used coordinating cardstock. Cutting the cardstock a tad smaller than the cello bags made for easy packaging. Quick and easy! 


Here is a close up photo of the pens - see the adorable mini fruits inside? So cute! 


The Itty Bitty punches have just been reduced from $40 to $28 - bargain!  


Product List
your photo name

Discounts added on select last-chance products

Well I know we all love a bargain so here it is - a select range of the last chance products have been discounted - up to 50% off!!

Please remember these are only while stocks last and once gone they are gone forever! 

Sale ends 31st May 2018. 


WAS $47.00
NOW $32.90 


WAS $21.00
NOW $14.70


WAS $37.00
NOW $18.50
WAS $40.00
NOW $28.00 


WAS $8.75
NOW $6.56

WAS $45.00
NOW $36.00


WAS $26.00
NOW $13.00

WAS $50.00
NOW $30.00
WAS $31.00
NOW $18.60

WAS $63.00
NOW $37.80 

WAS $37.00
NOW $25.90


WAS $8.00
NOW $4.80


Product List


your photo name

Magical Knight

This is such a fun set that I haven't played with nearly enough! I'm off to remedy that. This bundle and the Myths and Magic designer series papers are only available until the end of this month so hop to it if it is on your wish list. 

I needed some teenage cards for my nephews and I was inspired by some cards on Pinterest using night of navy and smoky slate which I thought was perfect for this knight. I matched the cardstock colours with my blends pens to add colour to the image.  


I have shown you a side on picture to show the wobble spring I adhered behind the knight to give him a 'bobble head' wiggle - he was a huge hit!

I bought the wobble springs on ebay - they were called 'action mini wobble springs'. They are adhesive on each end so super easy to use. And it folds flat so you can still put the card in an ordinary envelope. 


What a fun way to add a little extra to a card! Click on the images below to head over to my shop.


Product List
your photo name